1. Navigate to settings

2. Find Control Centre

3. Click on Customise Controls

4. Find Screen Recording on the list and select the green + button to add it to the panel, if you want to remove this, simply select the red – button

5. To use the recorder, on any page, swipe down from the top right hand corner and this will bring up your control panel.

6. Find the icon, when you click this it will start a 3 second count down to when it begins recording.

7. To stop recording, click on the top of the bar where the red dot is showing, it will ask if you want to stop or cancel

What are Hosts Files?

Often when previewing a website before it goes live you may be required to trick your computer into thinking that a website is on a different server to where the live site is.  To do this you will need to edit the host file.

Modifying Hosts Files

For Windows 10 and 8

  1. Press the Windows key.
  2. Type Notepad in the search field.
  3. In the search results, right-click Notepad and select Run as administrator.
  4. From Notepad, open the following file: c:WindowsSystem32Driversetchosts
  5. Make the necessary changes to the file.
  6. Click File > Save, to save your changes.

See below for an example of a hosts file.

You can add an entry by providing the the following

[your hosting account's IP address] [your domain name]
For example: 
12.0.0.1 sampledomain.com
Top tip
Once you are done testing the website. Remove it again on the hosts file or include a hash symbol (#)  before the IP address to comment the line out.

Never change the below lines:

127.0.0.1      localhost
::1            localhost

Use Microsoft Authenticator with Office 365

If your organization is using 2-step verification for Office 365, the easiest verification method to use is Microsoft Authenticator. It’s just one click instead of typing in a 6-digit code. And if you travel, you won’t incur roaming fees when you use it.

Download and install Microsoft Authenticator app

Set up the Microsoft Authenticator app

Choose the mobile app

Open a browser on your computer and go to portal.office.com. Sign in to your Office 365 for business account.

Use these steps if you see this screen:

  1. Click Set it up now.
  2. Choose Mobile app from the dropdown.
  3. Make sure “Receive notifications for verifications” is selected. Click Set up.

Use these steps if you see this screen:

  1. Choose Settings > Office 365.
  2. Choose Security & Privacy > Additional security verification > Update my phone numbers used for account security.
  3. In the drop down box under What’s your preferred option, choose Notify me through app.
  4. Check the box for Microsoft Authenticator app, click Configure.

Wait for configuration pop-up box.

You should see a window on your computer that looks like this.

Add account to Microsoft Authenticator

  1. Open the Microsoft Authenticator app on your phone.
  2. Tap the + > Work or school account.
  3. Use your phone to scan the QR square that is on your computer screen.
    Notes:

    • iPhone users may have to enable the camera in Settings in order to scan.
    • If you can’t use your phone camera, you’ll have to manually enter the 9 digit code and the URL.
  4. Your account will be added automatically to the app and will display a six-digit code.

Confirm activation status on your computer

  1. Switch back to your computer and click Done.
  2. Now wait for the Checking activation status text to finish configuring your phone.
  3. When it’s complete, you’ll be able to click the Contact me button on the right.
    Note: If configuration fails, just delete retry the previous steps again.

Approve sign in on your phone

  1. Switch back to your phone and you’ll see a notification for a new sign in.
  2. Go to the Microsoft Authenticator app.
  3. Tap Approve to allow it.

Finish set up

  1. Back on the computer, follow any prompts that you might see such as adding a mobile number.
  2. You’re good to go!

From now on, whenever you have a new sign in or add your Office 365 work or school account to an app, you’ll open the Authenticator app on your phone and tap Approve.

App/system: Microsoft 365 (aka Office 365)
Learn: How to set separate passwords for each app you use (eg Outlook)
Skill level: Moderate
Read time: 2 mins

To create an app password

Please note that if you are using Office 2019 you do not need to set up a separate app password because it already supports the latest authentication protocols. Therefore, you simply need to ensure that multi-factor authentication (MFA) is turned on (see step 2 below).

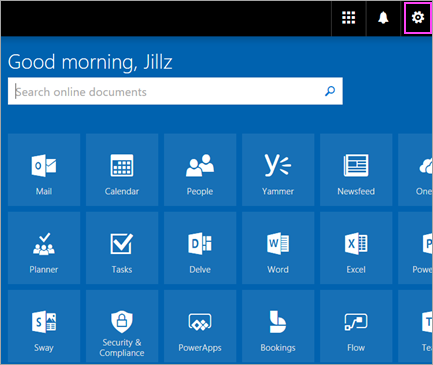
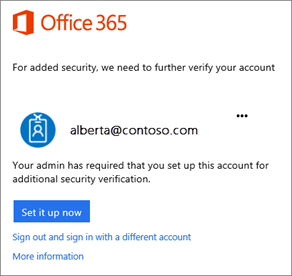
1) Sign in to Office 365 (now called Microsoft 365).

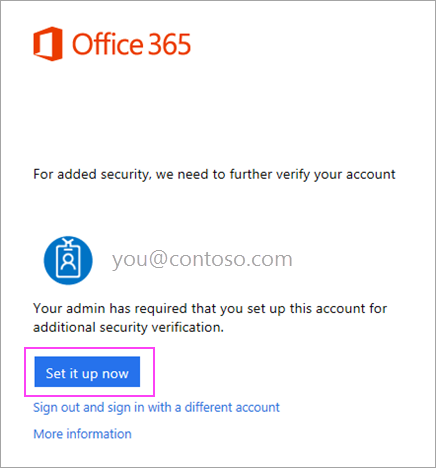
Go to https://aka.ms/SetupMFA
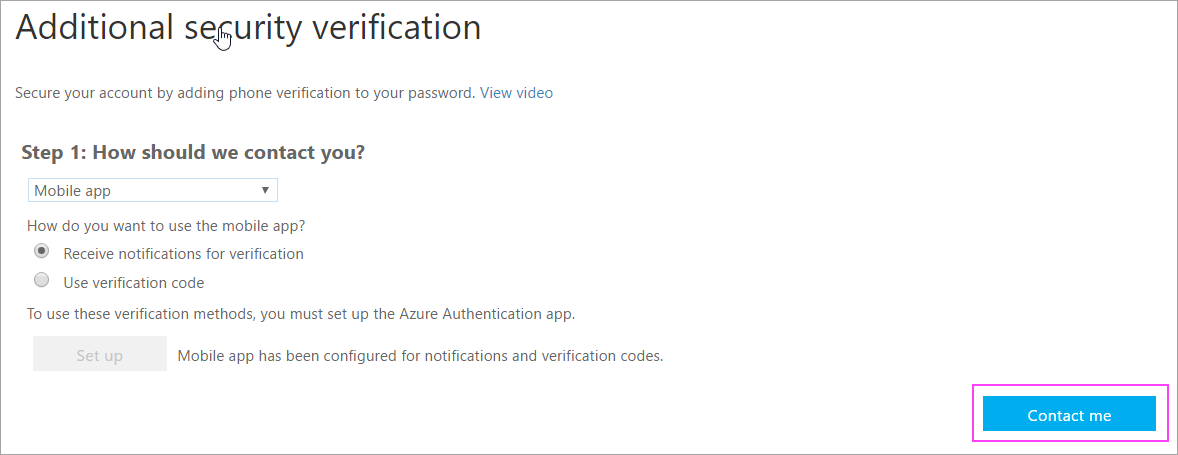
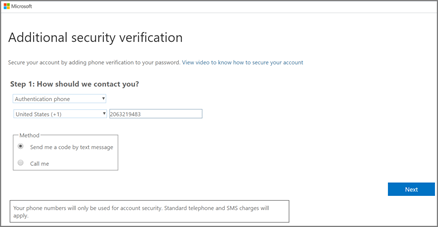
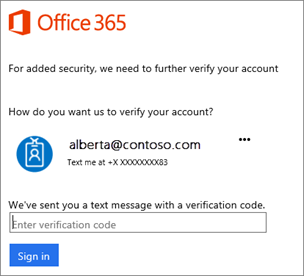
This will display the following page:

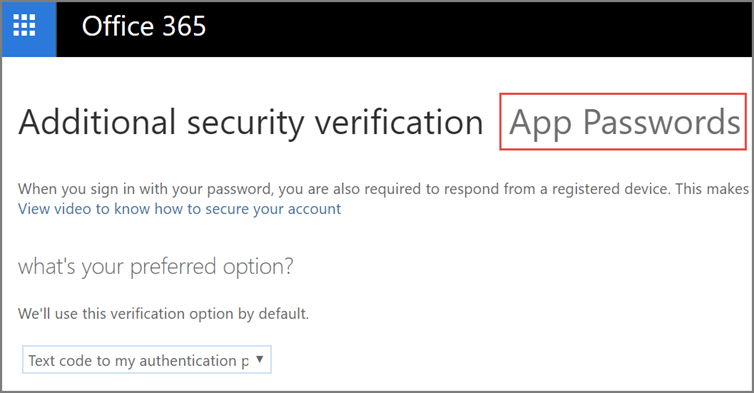
If you do not see this page then you may not have MFA turned on and you will need to speak to you IT Administrator.

2) At the top of the page, choose App Passwords.

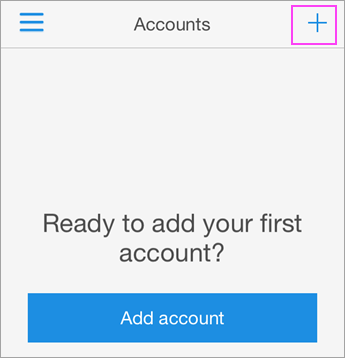
3) Choose create to get an app password.

4) If prompted, type a name for your app password, and click Next.

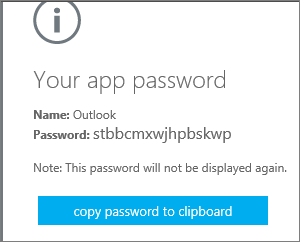
5) Choose copy password to clipboard. You won’t need to memorise this password.

Top tip
You can have more than one app password for your Office 365 account, for example, if you want one for Outlook and another for a different application. To generate another app password, simply repeat the process.

6) Go to the app that you want to connect to your Office 365 account. When prompted to enter a password, paste the app password in the box.

To use the app password in Outlook

Some applications do not support MFA. For these you will need to use what is called an App Password. This is a random password that is allocated to the specific application you are trying to configure. You create an app password through the portal. You’ll only need to do these steps once.

1) Open Outlook, such as Outlook 2010, 2013, or 2016.

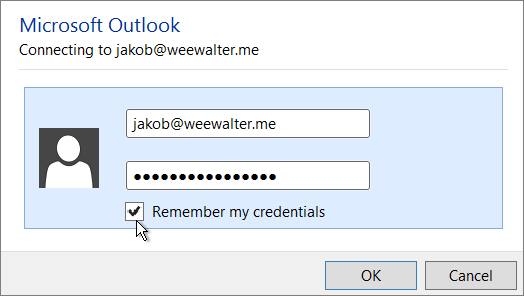
2) Wherever you’re prompted for your password, paste the app password in the box. For example, if you’ve already added your account to Outlook, when prompted paste the app password here:

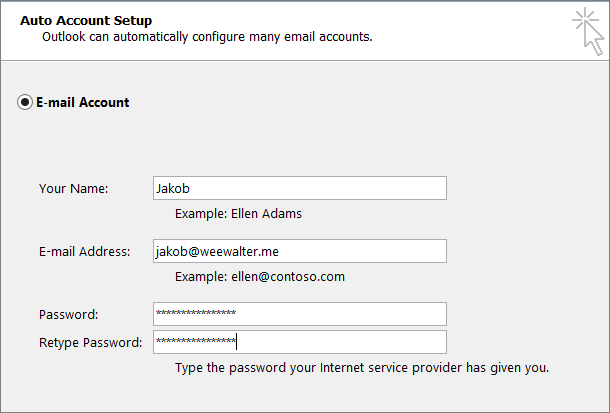
3) Or, if you’re adding your Office 365 account to Outlook, enter your app password here:

4) Restart Outlook

Top tip
You can have more than one app password for your Office 365 account, for example if you want one for Outlook and another for a different application. To generate another app password, see Create an app password instructions above.

Secure your Microsoft applications easily and effectively

Optimising the security of your IT services, including Microsoft 365, can seem a daunting and complex challenge.

At Heliocentrix we make it simple for you.

Whether you are setting up Microsoft 365 for the first time, or looking for IT support for existing systems, we can help.

Speak to one of our experts on 01732 600 170 or email us at sales@heliocentrix.co.uk.

Set up 2-step verification for Office 365

Once your admin enables your organization with 2-step verification (also called multi-factor authentication), you have to set up your account to use it.

By setting up 2-step verification, you add an extra layer of security to your Office 365 account. You sign in with your password (step 1) and a code sent to your phone (step 2).

1. Check whether your Office 365 admin has turned on multi-factor authentication for your account. If they haven’t, when you try to do these steps you won’t see the options in Office 365.

2. Sign in to Office 365 (https://portal.office.com) with your work or school account with your password like you normally do. After you choose Sign in, you’ll see this page:

3. Choose Set it up now.

4. Select your authentication method and then follow the prompts on the page. Or, watch the video to learn more.

5. After you verify your alternate contact method, choose Next.

6. You’ll get an app password that you can use with Outlook, Apple Mail, etc. Choose the copy icon to copy the password to your clipboard. You won’t need to memorize this password.

7. Once you complete the instructions to specify how you want to receive your verification code, the next time you sign in to Office 365, you’ll be prompted to enter the code that is sent to you by text message, phone call, etc. To have a new code sent to you, press F5

We strongly recommend setting up more than one verification method.

For example, if you travel a lot, consider setting up Microsoft Authenticator for your verification method. It’s the easiest verification method to use, and a way to avoid text or call charges.

To use the app password in Outlook

Some applications do not support MFA. For these you will need to use what is called an App Password. This is a random password that is allocated to the specific application you are trying to configure. You create an app password through the portal. You’ll need to do these steps once.

1. Open Outlook, such as Outlook 2010, 2013, or 2016.

2. Wherever you’re prompted for your password, paste the app password in the box. For example, if you’ve already added your account to Outlook, when prompted paste the app password here:

3. Or, if you’re adding your Office 365 account to Outlook, enter your app password here:

4. Restart Outlook

Top tip
You can have more than one app password for your Office 365 account, for example, if you want one for Outlook and another for a different application. To generate another app password, see Create an app password.

Chat with support

Installing Microsoft Teams

If you do not already have Microsoft Teams on your mobile phone, please go to the app store and search “Microsoft Teams”. The app, with the below logo, is free to download:

Once Microsoft Teams is installed, please open the app and sign in with your Office 365 credentials, which will be your company email address and password. If you are asked to allow any permissions, please click Allow.

Conference Calling

Microsoft Teams allows you to call anyone within your organisation. You can also have a conference call with multiple people in your organisation, free of call fees, using your mobile data or WiFi.

We’d always recommend to use WiFi where possible to save your mobile data, and ensure call quality is the absolute best it can be.

To start a conference call, open Teams and go to Calls. Click the + at the top right, and search for those you wish to call. Once you have selected everyone, click Call.


To add additional callers mid-call, click the plus at the top right, search for the person who you would like to add and click Add.

Frequently asked questions

  • As I am signing in with my work account, can work access my phone?

No – although Microsoft Teams uses your work account, it has no access to the rest of your mobile phone.

  • I have forgotten my Office 365/Email account password, can it be reset?

No problem, if you give us a call on 01732 600171 we’ll be happy to reset this for you.

  • I’m having issues installing the app, is there anyone who can help?

Absolutely, we’d be happy to. Simply call us on 01732 600171 and we’ll help you install the app and get up and running.

  • How many people can I add into a conference call?

Technically, up to 5,000 people can join a Microsoft Teams conference call.

  • I’d like to join a Teams call from my laptop/PC, is this possible?

Sure, you would need speakers and a microphone, which may be built in if you have a laptop. You’ll also need to install Microsoft Teams, which is available here.

  • Can I customise the background of Microsoft Teams?

Yes you can. Have a read of our Microsoft Teams custom backgrounds tutorial.

Creating the Meeting/Call

Microsoft Teams is a very powerful tool for conference calls. It can be used for internal conference calls without a license, but with the addition of an Audio Conferencing license, you can arrange meetings and add in external contacts to your calls.

In order for a call to have a phone number and ID for external callers, the call must be scheduled as a meeting.

To begin, open Microsoft Teams either on your PC/Laptop or your Phone. Go to the Calendar tab and click the + to create a meeting.

Give the meeting a name, add the participants within your organisation you’d like in the call, set the time/date of the call and click Save. You can also set the meeting to repeat, if it’s a regular occurrence. The participants you have chosen will receive a meeting request and calendar invite automatically.


Once you have clicked Save, you will notice the meeting is in your calendar. The meeting will also go into the invited participants calendar. Everyone invited will be able to see the meeting details.

You can click on the meeting to view the details either on your PC/Laptop or your Phone/Tablet. There is a phone number and call ID within the meeting details.

If you wish for an external contact to join the call, they just need to call this number to join the meeting and type the ID when prompted and they will be automatically added into the call via their phone.

Frequently Asked Questions

  • I don’t see a phone number or ID on my meeting?

You’ll only see a phone number and ID on the meeting when the organiser or one of the attendees has an Audio Conferencing license. Heliocentrix can check this for you and add one if required. Just give us a call on 01732 600171 or email us on support@heliocentrix.co.uk.

  • Are the calls expensive for external callers?

The phone number for meetings will be a local number in your area. Typically, in the UK this will be a London 0203 number and as such the call would be included in most UK mobile and landline call bundles.

  • I have a caller from outside the UK, is there another number they can call?

If you have a caller from outside of the UK, click on “Local Numbers” in the meeting details and you will be presented with phone numbers around the world which you can call to join the meeting. If you have several callers from different countries, they can call their local number and use the same ID to join the same meeting.

  • How do I know an external caller has joined my meeting?

When the external caller calls in and provides the ID, they are asked to specify their name. As they are added into the call, the other participants will hear an automated message saying “*Contact Name* has joined the call”.

On 1st July 2019, new switching regulations were introduced by Ofcom, and we want to ensure you are fully informed when it comes to requesting switching information from us. You can also request a PAC or STAC code via text, your online account or by phone. 

We’re always sorry when our customers are thinking of leaving us, however we aim to provide a great service from the day you join to the day you leave.  

Requests by SMS 

Switching Information – We will provide you with an SMS/Email detailing relevant information such as your contract end date and your early termination fees. 

Text “INFO” to 85075

PAC – We will provide you with an SMS/Email listing your PAC, which can be used to transfer your number over to your new provider. We will also include your early termination fees. 

Text “PAC” to 65075 

STAC – We will provide you with an SMS/Email listing your STAC, which can be used to enable your new provider to disconnect your existing number if they are providing a new one. We will also include your early termination fees. 

Text “STAC” to 75075 

Requests by Phone 

Our support team is here to help. Our staff can provide all the information you need to know around switching and all of our other services. Call us now on 01732 600 170. We’re happy to help, whether the query is regarding moving to, or away from, our mobile services. We may request confirmation in writing following your phone call. 

Points of Note:  

  • PACs and STACs are Valid for 30 days 
  • The above ‘Request by SMS’ processes can only be utilised for a single request at a time and can only be used for the mobile phone number sending the SMS 
  • Requests for between 2-24 numbers can be requested by post, email, or by phone, and are covered within the policies laid out under the new regulation. Requests by post should be sent using recorded delivery with proof of postage obtained. 
  • There is no charge for an SMS being sent or received when using this service 
  • Contracted notice periods and related fees are not chargeable when using this service, but you may have to pay an early termination fee and the remaining balance of your contract. 

FAQs 

Q: How quickly should I receive my switching information from my provider?
A: For the most part, all requests will be actioned within hours. However, official timescales for business customers is two working days. 

Q: What is an Early Termination Fee (ETF)?
A: An ETF outlines all costs associated to your mobile subscription if you terminate your agreement prior to the agreed contract date. 

Q: Can I request a standard disconnection?
A: In the event you wish to simply cancel your agreement, you can still do this. You will be required to confirm your request in writing with 30 days’ notice.  

Q: What happens to my other services if I switch my mobile provider?
A: Other services, un-associated with your mobile subscriptions, will remain unchanged. 

Q: What if I want to switch 25 numbers or more?
A: This legislation covers switching for up to 24 numbers. Requests of 25+ numbers will be subject to standard terms and conditions including notice fees and associated charges.