Presentations: love them or hate them, they’re here to stay in the business world. Whether you’re a seasoned PowerPoint professional or a beginner there’s always more to learn, especially as new features are always being added for Microsoft 365 subscribers.
What is PowerPoint?
Microsoft PowerPoint helps you to create slideshows for professional presentations. It allows you to easily share information, charts and images. With more of us working remotely and now running fully remote or hybrid meetings, being able to use PowerPoint well has never been more important.
As with most professional software, it can take a long time to get familiar with all the features and handy short-cuts so in this guide we’ll help you to save time while creating even better results.
Did you know that Microsoft was first developed in 1987 for the Mac? It was created by a company called Forethought Inc. and was purchased by Microsoft in 1990. The latest version of Microsoft PowerPoint is available in Microsoft 365 (M365) as both PowerPoint for web and PowerPoint desktop application. This How-To guide is for the M365 version of PowerPoint.
How do I find a feature quickly?
Microsoft has introduced a new feature to Microsoft 365 – the Search bar. It’s designed to save you time, so it’s worth knowing how to use it.
It might be in different places depending on your set-up. Find it:
- in the Ribbon to the right of all the tab headers
- above the Ribbon in the red title area
- using the keyboard short-cut Alt-Q
Type in the function or task you are looking for, for example change handout orientation. The menu will now show you search results for this task, saving you from clicking through all the tabs trying to find the feature. It will also remember features you’ve previously clicked on in the search box so tasks you often perform are listed first and therefore easier to find.

How to create or delete slides in PowerPoint?
By using different slide layouts you can break things up by adding image based slides and sub-title slides to keep your audience engaged. Did you know that you can quickly and easily choose the layout you want for each slide from the pre-set options?
Add:
- Open the presentation you’re working on.
- In the slide thumbnails on the left pane, select the slide you want the new slide to go in after.
- Or, go to the Home tab and in the Slides section, select New Slide. This will open a drop-down gallery and you can select the layout you want from the gallery.
Delete:
- In the slide thumbnails on the left-hand pane, select the slide you want to delete.
- Right click and select Delete Slide from the menu that appears.
- To delete more than one slide at once, press and hold Ctrl. In the thumbnail pane on the left, select the slides. Right-click your selection and select Delete Slide.
How to copy a slide in PowerPoint?
If you are creating a number of slides with the same layout or images, it will save you time to copy them instead of creating each one from scratch.
- Select the thumbnail of the slide you want to copy. (To select multiple slide thumbnails, press and hold CTRL)
- Right click and select Duplicate Slide.
How to make slides portrait in PowerPoint?
This feature is sometimes easy to miss as the default orientation is landscape slides. Here’s how to make them portrait.
- Select the Design tab of the toolbar ribbon.
- Select Slide Size, towards the far-right end of the toolbar.
- Select Custom Slide Size and select the Portrait radio button.
How to change slide shape and size in PowerPoint?
Sometimes you don’t want the usual landscape or portrait slides. This option is especially useful if you’re creating a poster.
- Select the Design tab of the toolbar ribbon.
- Select Slide Size, towards the far-right end of the toolbar.
- Select the option that fits what you need (options are: Standard(4:3 aspect ratio) or Widescreen (16:9) or Custom Slide Size.)
[cta small_heading=”Find out more” cta=”Would you like help with any aspect of using Microsoft 365? We are more than happy to help.” button_text=”Speak to one of our experts” button_link=”/contact/”]
How to add a GIF to PowerPoint?
We all know that adding images helps break up the bullet points and makes a presentation more interesting. Did you know you can go one step further and add a GIF?
- Go to the Insert tab and select Pictures.
- Select the animated GIF you want to add.
- Select Slide Show to see the animated GIF play.
How to add a video to PowerPoint?
If you’ve got a video you’d like to include in your presentation, whether it’s one created by you and you have the file on your laptop or if you only have a link from YouTube.
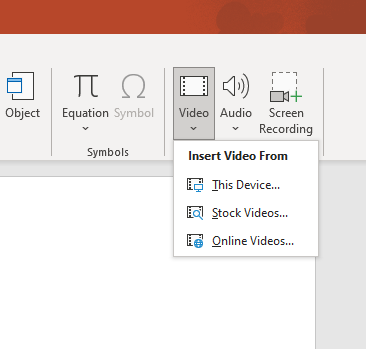
Go to the Insert tab and select Video from the Media section, and then choose:
- This Device: Add a video that’s stored on your computer.
- Stock Videos: Choose to purchase a video from a stock library.
- Online Videos: Add a video from YouTube or paste in an embed code.
How to add (speaker) notes to a PowerPoint presentation?
PowerPoint gives you the option to add speaker notes, that only you as the presenter can see. This can be useful if you’re creating a presentation that a colleague will be giving.
- Click in the Notes pane below the slide. (If you don’t see the Notes pane under the slide, try going to View and clicking Notes.)
- Type your notes and save as you normally would.
- To read your notes: when using Presenter View (note that this is only available if you’re using Microsoft Teams to present or have two monitors), your Notes for each slide appear under the Next slide. Scroll to view all of them if necessary.
How to add a hyperlink in PowerPoint?
The basic way to add a hyperlink is to type (or cut & paste) the address of an existing webpage (e.g. https://heliocentrix.co.uk/ ). The hyperlink is added automatically after press Enter.
To link text, a shape or picture to a website:
- Select the text, shape, or picture that you want to use as a hyperlink.
- Go to the Insert tab and select Link then Insert Link.
- Select Existing File or Web Page, and add the website address.
- Text to display: Type the text that you want to appear as hyperlink.
- ScreenTip: Type the text that you want to appear when the user hovers over the hyperlink (optional).
- Address: If you haven’t already selected a location above, insert the URL for the web site you want to link to.
- Select OK.
[cta small_heading=”Find out more” cta=”Discover the difference that Microsoft 365 can make to your business. Get in touch to find out more.” button_text=”Speak to one of our experts” button_link=”/contact/”]
How to curve text in PowerPoint?
Have you ever wondered how some people manage to create text that curves and jumps out of the screen on their presentation? It’s easy to do within PowerPoint if you make use of the WordArt function.
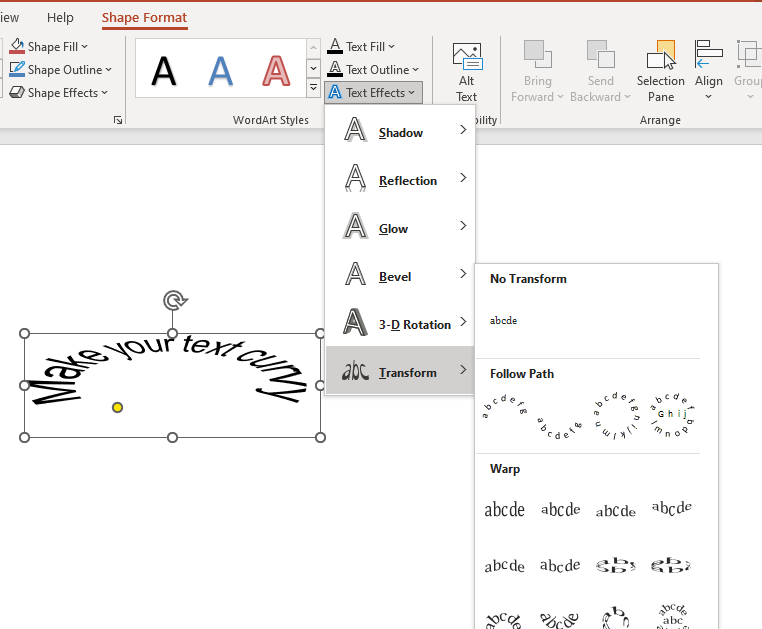
- Create the text you want to curve and make sure it’s selected. Click on the Format tab and choose the text style you want.
- From the Shape Format tab select Text Effects then Transform. Choose the curve effect you want from the menu that appears.
- You can drag the textbox handles and yellow dot to adjust the curve and shape of the text.
How to flip an image in PowerPoint?
In order to get exactly the visual impact you’re looking for, you can rotate and also flip pictures, shapes and also text boxes.
- Select the item that you want to rotate.
- To rotate: select the rotation handle at the top of the object, and then drag in the direction that you want.
- To flip an object, go to the Picture Format tab and select Rotate and then Flip Vertical or Flip Horizontal.
How to add footer to PowerPoint slides?
If you want to add references to your slides or any other supplementary information, you can use the Footer setting. You can have different information in the footer for each slide or you can set the footer to be the same for all.
- On the Insert tab, click Header & Footer (if you’re using the PowerPoint web application it may be just Footer)
- A new dialogue box or side bar will open. Select Footer and type in your footer text to add it to the current slide. Click Apply to All to add this footer to all slides.
How to use subtitles in PowerPoint?
Microsoft have introduced the ability to include real-time, automatic subtitles in your PowerPoint presentations.
Subtitles can be really useful in the following situations:
- If your audience is deaf or hard of hearing
- If your audience speaks a different language
- If your audience is watching remotely with the sound turned off
To access the subtitle functionality: Go to the Slide Show menu and select Subtitle Settings.
See our in depth article: How to use subtitles in PowerPoint for more information.
How to record a PowerPoint?
A new feature for Microsoft 365 has been rolled out just this year, you can now record yourself giving your presentation so others can play it back later.
Select the Record tab and choose the options you require. (If you don’t see the Record tab, you may first need to go to Customize Ribbon and make the Record tab visible.)
- When you’re ready, select Record and press the round RECORD button to start.
- You can record audio or video narration as you run through your presentation.
- Use the onscreen laser, coloured pens, or highlighters and these will be recorded too.
- PAUSE the recording as needed or select STOP if you’re done.
- Save your presentation.
- Click File> Export > Create a Video (or, on the Recording tab of the ribbon, click Export to Video) and follow the on screen prompts.
[cta small_heading=”Find out more” cta=”Get the most from Microsoft PowerPoint and other Microsoft 365 apps with our managed IT support.” button_text=”Speak to one of our experts” button_link=”/contact/”]
How to add music or audio to a PowerPoint?
Note: if you’re using PowerPoint for the web you can play music or sound effects that you’ve added to your slides but you can’t add them from within PowerPoint for web. Make sure you open your presentation from the Desktop Application before you try to add audio/music.
Once you’ve opened the presentation you want to work on:
- Go to the Insert tab and select Audio.
- Select Audio on My PC.
- In the Insert Audio dialog box, select the audio file you want to add.
- Select Insert.
If you want to record audio, for example your own narration of your slides then you need to:
- Go to the Insert tab and select Audio.
- Select Record Audio.
- Type in a name for your audio file, select the red dot Record button, and then speak.
- Select OK when you are happy with your recording.
How to reduce the file size of a PowerPoint?
PowerPoint files can sometimes be large, especially if you’ve added images and video. To make them easier to store and send, you can use the compression feature to reduce the file size. You need to be using the PowerPoint desktop application to do this.
- Open the presentation that contains the audio or video files.
- On the File tab, select Info, and then in the Media Size and Performance section, select Compress Media*. (Embedded subtitles and alternate audio tracks are lost in this compression process.)
- You can choose the quality of the video, which will determine the size of the video file. Choose a lower quality to create a smaller file size.
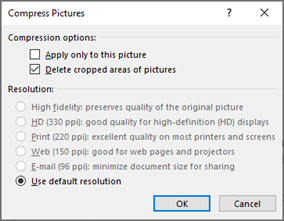
- To compress pictures in your PowerPoint presentation: select a picture in your document. The Picture Format tab appears.
- On the Picture Format tab, in the Adjust group, select Compress Pictures.
- Under Compression options you can Apply only to this picture; Delete cropped areas of pictures or set the resolution.
What is a slide master in PowerPoint?
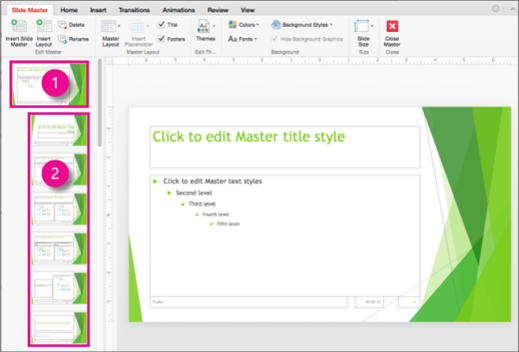
A slide master is used to add consistency to your colours, fonts, headings, logos, and other styles. It’s a great way to ensure company branding is used consistently on presentations, no matter who creates them.
Go to the View tab and select Slide Master. The master slide is the top slide in the thumbnail pane on the left side of the window. The related layout masters appear just below the slide master (as in this picture from PowerPoint for macOS):
How to create or modify a slide master in PowerPoint?
- Go to the View tab then select Slide Master.
- Make the text, colour, and alignment changes you want.
- If you want to use a predefined theme, select that first by clicking Themes on the Slide Master Then proceed with selecting Colors, Fonts, Effects, and Background Styles.
- Remember to select Close Master View when you’re finished – it’s easy to forget this step!
How to make a PowerPoint template?
You can create a template PowerPoint template (.potx file) to share slide branding and layouts with colleagues. To create a template you’ll need to modify a slide master and a set of slide layouts. If you’ve not yet read the previous section on How to create and modify master slides in PowerPoint, we recommend you scroll up and read it first.
- On the File tab, click Save As or Save a Copy.
- In the Save As dialog box, in the Save as type list, choose PowerPoint Template.
- When you choose the “template” type, PowerPoint may automatically switch the storage location to the appropriate folder, the Custom Office Templates
- In the Save Asdialog box, in the File name box, type a file name for your template, or do nothing to accept the suggested file name.
- Select Save.
How to convert my PowerPoint to a PDF?
Not everyone can open PowerPoint files as not everyone has the software. How do you share your presentations with anyone? The answer is to save them as a PDF or XPS file.
- Go to the File tab and select Export from the options on the left.
- Click the Create PDF/XPS
- In the File Name box, enter a name for the file, if you haven’t already.
- In the Save as type list, ensure that PDF (*.pdf) is selected.
- If you want the file to open in the selected format after saving, select the Open file after publishing check box.
- Click Options to set the pages to be printed, to choose whether markup should be printed, and to select output options. Click OK when finished.
- Click Publish.
Would you like help with any aspect of using Microsoft 365? Or maybe some support on reliable IT with minimal downtime? Contact us, we’ll be more than happy to help!